Beginner Astrophotography Without A Telescope
- David Farina

- Mar 7, 2021
- 6 min read
Updated: Apr 2, 2021
The biggest misconception about astrophotography is that it needs to be done through a telescope. Although you can certainly do Astrophotography through a telescope, and that may be your end-goal, it honestly isn't the best place to start. The best way to get started is using just a camera and a lens. Wide-field astrophotography can even now be done on higher-end cell phones such as the new iPhone and Google Pixel series which now have a dedicated "astrophotography" mode. Even more importantly, if you have a DSLR or mirrorless camera capable of doing long-exposure photography, you won't believe the amazing images you can create.

"The biggest misconception about astrophotography is that it needs to be done through a telescope."
The Foundation of Astrophotography
The most important thing in the case of wide-field astrophotography is to start by getting yourself a good tripod that will grow with you. I can say that there is a range of tripods out there, but many of these tripods were designed first for the purpose of daytime photography and videography, so put some thought into that before making your purchase.
"Wide-field astrophotography can now be done on higher-end cell phones such as the Apple iPhone and Google Pixel series which now have a dedicated "astrophotography" mode."|
A tripod is the literal foundation of your astrophotography rig, whether that be an enormous tracking mount with a massive telescope or simply a single image was taken with a camera and lens. In order to meet the demands of long-exposure photography, and specifically, night-sky photography, your tripod and mount need to be rock solid. The smallest shake can be seen when stars, which are supposed to be single points of light, start to smear across your image with big bloated stars.

Some Words of Advice and Support
Many of my first shots were very much like the one seen above over the room of my house. You should NOT be discouraged by results like the image of Orion, Canis Major, and Taurus above. These are the level of an image where we all started, more or less. Regardless of where you start in this hobby, realize that you are entering a learning curve for a very challenging hobby, but that the payoff is unbelievable and life-changing in so many amazing ways.
Astrophotography requires a level of persistence as well as patience and grace for yourself. Don't compare yourself to others out there. Just go for those personal bests, and push yourself to grow. Surround yourself with others at all levels of astronomy. Learn from them. Do your best to support each other, and enjoy one of the best communities I know of. Astronomers are awesome people with a perspective on the Cosmos that I have personally found my lasting life-long friendships in. That's why I am here trying to help you, hoping to give back to a community that has helped me find myself.

The Importance of a Good Tripod - The Foundation of Your Astrophotography
One of the most exciting lightweight (5 lbs.) travel tripods I have seen over the last decade in the hobby is the new Radian Telescopes Quick-Release Carbon Fiber Tripod from Radian Telescopes. Radian Telescopes is an up-and-coming telescope brand that promises premium level products that are primarily targeting the astrophotographer.
Why spend the extra money on a premium tripod like this one? This tripod has a massive 55lb load capacity, allowing you to place and telescope tracker and camera combination on it without concern. Furthermore, as you and your gear continue to grow, you can literally place a small to medium refractor telescope and go-to mount on this tripod without hitting this load capacity, all in a tripod that weighs less than 5 pounds. Similar tripods in this class are hard to come by for a more reasonable price.
Many times with complex astrophotography systems it is hard enough to just build up the motivation to go outside because you know it takes a lot to set up and break down.

This tripod also has a number of features that are important to imaging in a range of different scenarios. The Radian tripod also comes equipped with a quick-release plate that allows for a quick setup which is extremely important to ensure you make the most of your night under the stars. Additionally, the quick-release plate allows for the breakdown of your equipment at the end of the night with little hassle without fumbling around in the dark, dropping screws in the grass, and getting frustrated.

The standard rubber grip feet that work well on hard surfaces like asphalt and concrete can be replaced with spikes to allow for a more stable footing on loose, uneven, and sloped ground. Speaking of sloped ground, one more extremely important feature is the built-in bubble level (seen in the image above).

The bubble level, in conjunction with the fully articulating legs, allows you to set up your tripod level with the horizon no matter how flat, smooth, sloped, or rocky the terrain. The fully articulating legs also permit you to frame your image with low-lying foreground objects along with the stars to produce stunning depth in your images with ultra-foreground objects, medium distance background landscapes, and amazing wide-field astrophotography in a single image.

This tripod also has the added benefit of coming with a soft protective oversized carry bag with a handle that allows for a comfortable and safe way to hold your tripod and tripod accessories while on the move, even across rugged terrain. The bag provides the convenience and protection you expect from a brand like Radian. The oversized bag means that you will have extra room for those extras you pick up along the way and don't have to force the tripod into the bag.
Automation is the Key to Success
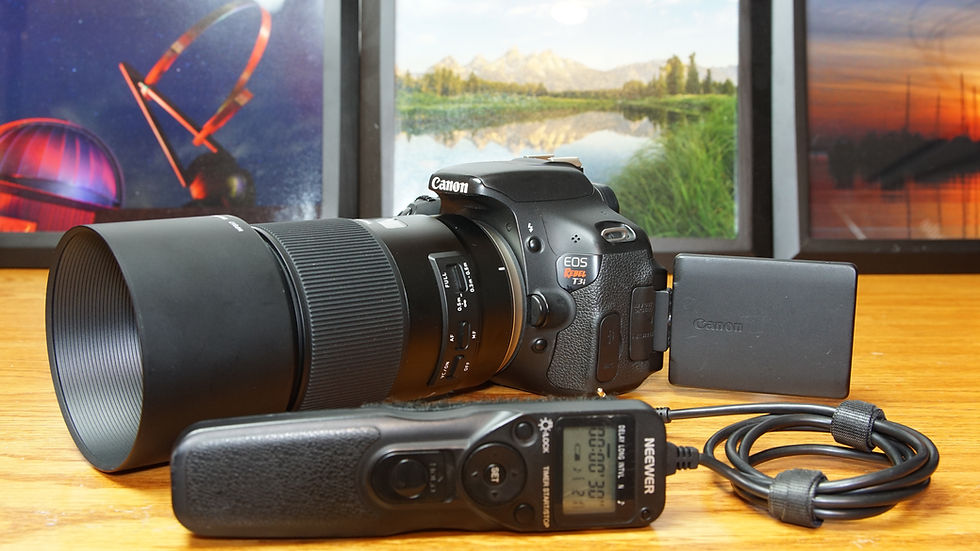
After you have a good tripod, the next part of creating amazing wide-field astrophotography is to get your hands off of the camera. The use of an intervalometer, like the one imaged below, is a major way to improve your images and also start the process of "automating" your imaging process.
"After you have a good tripod, the next part of creating amazing wide-field astrophotography is to get your hands off of the camera."
As you will find, the process of taking an astrophoto is actually not a single exposure, but multiple images of the EXACT same thing over and over again. Intervalometers provide the ability to set the exposure time, number of images, and the time between images, and will remotely trigger your camera's shutter. Some cameras offer in-body intervalometers, but I have yet to experience one that was as easy and useful as ones that can be purchased for as little as $20 on Amazon. Be aware, intervalometers are camera-specific, so you need to do some homework on this one.
Tracking the Apparent Movement of the Night Sky
Unfortunately, the camera and lens combination above 90mm is not a very great combination for astrophotography without another key component to successful astrophotography. One of the issues that plague most beginner astrophotographers is that the sky actually appears to move rather quickly through your camera's field of view. Of course, the actual cause of this "apparent" motion is due to the rotation of the Earth on its axis. Since we humans are standing on that spinning planet, we observe the "apparent" motion of the night sky above us similar to how we observe the landscape "move" past us as we drive down the road in a car.
Of course, star-trail photography is one of the ways you can enjoy astrophotography without a tracking mount, but one of the major constraints of this type of image is that it is the foreground rather than the sky itself that becomes the subject, severely restricting one's ability to take beautiful shots to the handful of times you are lucky enough to travel to beautiful places. There are only so many shots of star-trails from your backyard that you can take before it starts to lose its luster.

A small tracking mount like the SkyWatcher
Star Adventurer 2i Pro Pack is one of the most
economical and future-proof ways to provide
you with the next level of tracking you are striving for. However, in order to keep this blog focused on getting started, I will have to wait for a future blog post. Take it one step at a time, learn the settings on your camera, get a good tripod, and eventually, you will want to get one of these. They are wonderful, but not necessary to get some KILLER images of the night sky.
A second way around the motion of the night sky is to do a time-lapse image of the night sky similar to my Orion clip below.
As you can see by this image, which was taken by simply pointing my wide-field camera lens towards the eastern horizon and taking a number of shots with the intervalometer, you can produce beautiful videos in about an hour. The longer the focal length of your camera lens, the more apparent this effect is.
I have some really amazing stuff coming your way soon and am in the process of bringing my experience in both visual astronomy and Astrophotography to you in the future. I also hope to bring my passion for teaching the science of astronomy to the online world. Please consider subscribing to this blog at the bottom of your page.
Please also consider following Cosmos Safari on my YouTube Channel, Facebook, Twitter, Instagram, and TikTok accounts. If you are interested in more of the LIVE video format and to speak with me directly, consider heading over to my Twitch Channel. If you would like to directly support this blog and Cosmos Safari, I would truly appreciate your patronage through my Patreon account.


Comments